
How to Draw Halloween
There are many fun holidays throughout the year, festive pleasure at Christmas, pleasure for Easter eggs, and family pleasure on Thanksgiving. Halloween is one of the funniest and is certainly the scariest! These holidays concern pleasant costumes, frightening decorations, and tons of sweets.
One of the best ways to get into the Halloween movement is to learn how to draw Halloween things! It is the perfect guide for all those who want scary designs! You can draw many more characters like bow and arrow drawing, Anubis drawing, betta fish drawing, cobra drawing, blueberry drawing, coconut drawing and many more drawing ideas.
Drawing Halloween
Step 1:
What is more Halloween there than a flashlight wearing a witch hat? If you answered “nothing,” you are right! It is exactly what we will draw for this first stage of our guide on how to draw Halloween. You can start by drawing a small square shape and then draw another square around you. It will serve as a group loop around the witch’s hat.
Then we can start with the edge of the witch hat! You can use curved lines to the edge of the hat and then draw them curved inside to the bottom of the edge. The reference image will show what we mean if it seems confusing; therefore, after reproducing the lines of our example, you will be ready to go to step 2.
Step 2:
Now we can draw more hats and start the pumpkin for your Halloween design. Let’s start with the hat first! Use straight lines climbing the loop horizontally to the handle around the hat. Then you can use curved and wavy lines to the tip of the hat, sloping itself.
Now it’s time to start the pumpkin! Start by designing winding lines that come down from the inside of the hat to one of the pumpkin vines. Then use a rounded line to the left side of the pumpkin and add a small sheet to the base.
Step 3:
In this third stage of our guide on how to draw Halloween, we will draw the other side of the pumpkin. This site will look very similar to the left, with just a few differences. First, draw another winding vine that goes down this side, and you can add a sheet to this vine to one of these differences. The rest of this site will be almost the same as the other side; therefore, use a curved line to the right side of the pumpkin and add another sheet to the base.
Step 4:
It wouldn’t be a flashlight without the face, so let’s add this to this part of the Halloween design. The face is composed of the eyes, nose, and mouth smiling, and, as you can see in the reference image, all will be designed with very angular lines to make them look carved.
You can also track some lines within these shapes to make them look like recordings in the thick pumpkin. Then finish this step by adding some curved lines to the pumpkin segments. There are just a few final details to add to the next step, so let’s move on!
Step 5:
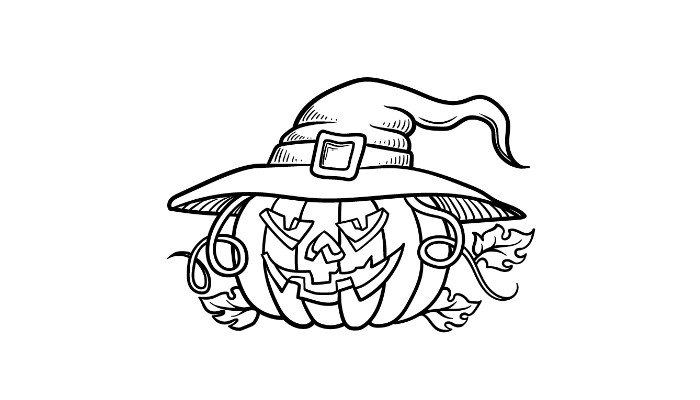
At this stage of our guide on how to draw Halloween, we will end certain final keys to make it even better. The details we add will be subtle but effective! Add a few thin lines to the hat for some shade details, and add below the hat.
So you are ready to go to the last step! Before you do it, you can also add some details to finish it. You can do a lot here, and it’s your chance to show what your perfect Halloween configuration is! You can draw sweets, decorations or ghosts and scary ghosts for some ideas. How will you finish this drawing?
Step 6:

This stage of your Halloween drawing will be to bring him with color! We use orange, vegetables, gray, and brown in our image, but these colors are just a suggestion. You can choose many amazing colors, and it’s your chance to launch your Halloween creativity! Depending on the colors you want, you can also play with various art media to make them.
For brighter colors, you can use acrylic paintings or pens and colorful markers for some suggestions. More mute shades can be obtained with certain means, such as color pencils or watercolors, so many options are available! What colors and means will you use to finish this image?
Do this to pass your Halloween drawing to the next level
There is nothing scary in this advice we have for this Halloween outline. There are so many details to admire in this Halloween design we created together, but we could add even more around you! A pumpkin is a common view of Halloween, but you can add many more decorations. It may include false bats, snakes, and other scary creatures. Or you can add spider screens and skulls.
These are just some ideas for smaller decorations you could add, but what else can you think? After adding these smaller decorations, you can add the largest. There are so many different ghouls and scary characters around these scary vacations. You can draw ghosts, zombies, or even a skeleton rising from the floor. These can be made to look like false versions, but maybe they may even be real!
It all depends on the scene you would like to create here. What are the other creations that make this Halloween design even scarier? Then it would be fun to finish this Halloween outline by adding the rest of the background. We have added many decorations, so it’s time to decide where this Halloween configuration is.
It may be in front of a house, so tricks or tremors admire it. Or, you may be in a scary cemetery with ghosts and gambol ghouls. Are there so many background ideas to choose from when you want? Finally, the colors you choose will greatly impact the kind of feeling you want to create. We’ll cover other options for this Halloween design!
First, if you want a colder and more frightening feeling, you can keep the colors lighter using media, such as pencils or colorful watercolors. For a more vibrant sensation, colored pens, markers, and paintings would be an excellent alternative to burst colors.
Your Halloween drawing is complete!
You have come to the end of this guide on how to draw Halloween and have a super scary image to show! We hope this guide has made it fun and easy for you to capture Halloween’s spirit creatively. Our goal with this guide was to make this draw not a frightening experience for you!
You can now be in charge when adding your details, items, and final additions to the mixture. We mentioned some ideas you could go to earlier, such as the design of other Halloween decorations and characters, but what else can you think to finish this image?
Also Read: How to Draw Mars